, ,

Now Offering Dry Needling Muscle Trigger Point Therapy!

Dry Needling

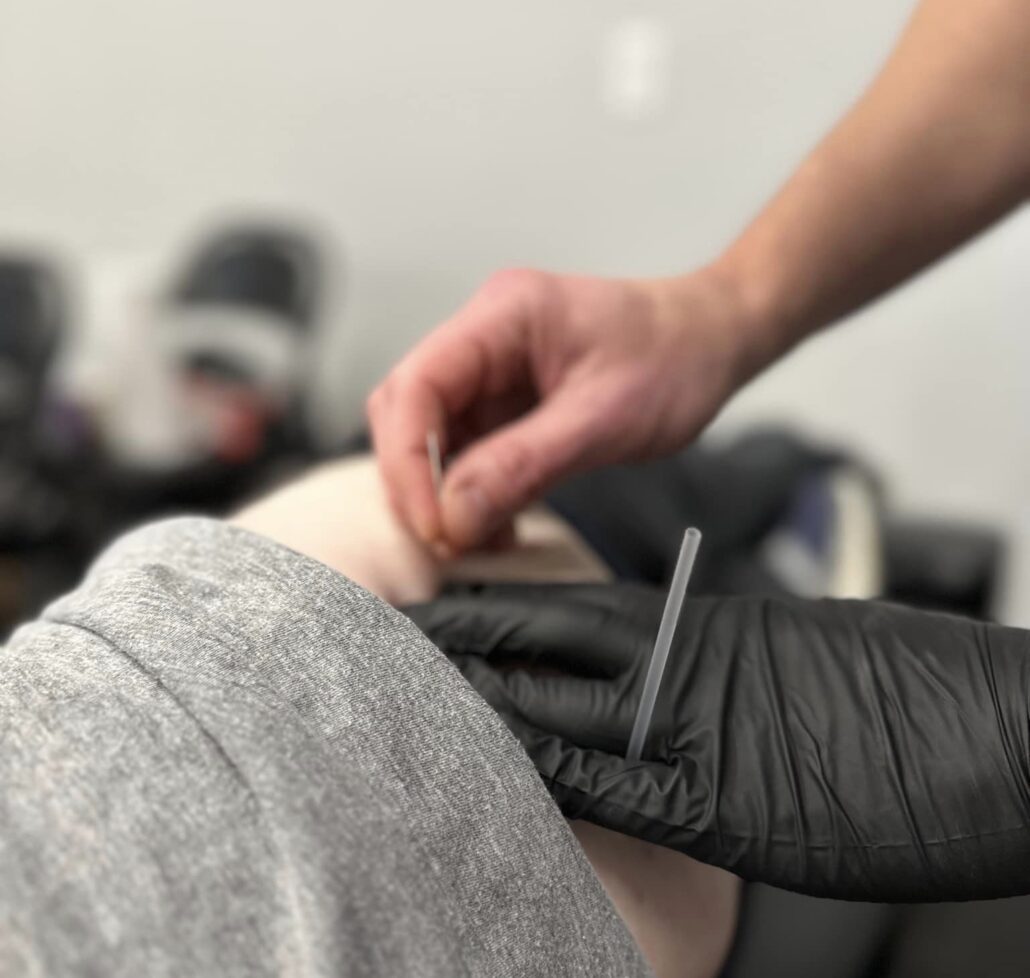
Dry needling is a manual physical therapy technique that uses acupuncture needles to treat trigger points in muscles. Instead of leaving the needles shallow in the skin as with traditional acupuncture, the needle glides deeper into the muscle tissue in a pistoning motion to mechanically stimulate blood flow to the knotted area. This can reduce central sensitization, reduce local and referred pain, improve range of motion and muscle activation patterns, and improve the chemical environment of the area. The treatment time is quick and just takes a few moments per muscle group. Sometimes electricity is added to the needle to further stimulate the site, but not required for a successful treatment.

You can expect the treated muscle to feel fatigued and sore, similar to the feeling you get after a good workout or massage. Occassionally there will be bruising at the site that resolves in a few days. Bruising does not occur every time. Very minimal bleeding can occure during the treatment. This happens even less often than bruising.

Dry needling is a wonderful addition to chiropractic care. This allows Dr. B to give more attention to the patient’s soft tissues, improving treatment outcomes for many different neuromusculoskeletal pain patterns. Even patients who report fear of needles have done well recieving treatments. Ask to add it to your next appointment visit for just $45.

, ,

Science Based Nutrition Blood Labs

Now offering Science Based Nutrition Blood Lab Analysis with Supplement Recommendations!

  1. Fill out a symptom survey (ask us for your personalized web link)
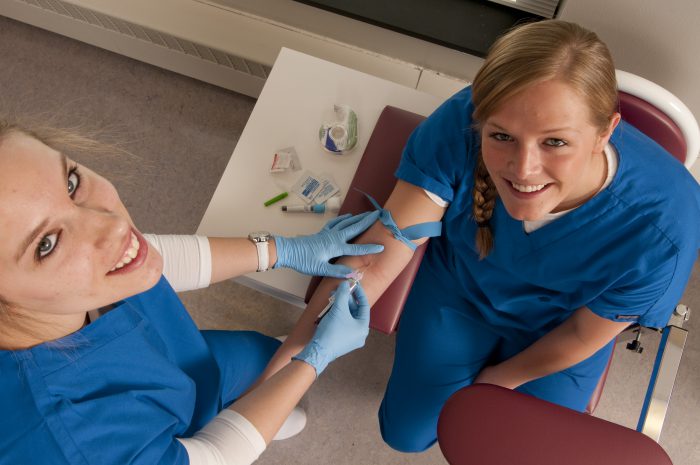
  2. Go to Labcorp for a blood draw
  3. Receive a comprehensive nutritional report based on your labs

When we analyse the blood, we can identify discrepancies that may be corrected with dietary changes and supplementation before they become serious health problems. Otherwise, when your blood is evaluated at a routine screening, the doctor that interprets the readings might not explain these recommendations if the results fall within a certain window deemed “normal”. There is a larger opportunity available for patients to act on lab findings before they get out of hand to become irreversible health problems.

By looking at the blood, we can more accurately choose specific supplements the body may be lacking instead of trying supplements based upon symptoms alone. We can also recommend dietary and lifestyle changes based on your specific results.

Dr. B’s office is in Lenexa, KS but can treat patients all over the United States via phone and email.

$375 HSA Health Savings Accounts, and Flexible Spending cards accepted. We do not bill health insurance. If you would like to submit for reimbursement on your own, you may forward your payment receipt to them. Call 913-283-9803 or email [email protected] to get started.

There are 50+ perameters that are measured and recorded on the report listed below. If you are interested in any other specific tests, we may be able to add it to your order for an additional cost.

Glucose, Hemoglobin A1C, Uric Acid, BUN (Blood Urea Nitrogen), Creatinine, GFR Est., BUN / Creatinine Ratio, Sodium, Potassium, Chloride, Calcium, Phosphorus, Magnesium, Total Protein, Albumin, Globulin, A/G Ratio, Total Bilirubin, Alk. Phosphatase, Creatine Kinase, LDH, SGOT (AST), SGPT (ALT), GGT (r-GTP), Total Cholesterol, Triglyceride, HDL Cholesterol, VLDL Cholesterol, LDL Cholesterol, Total Cholesterol / HDL Ratio, TSH, T4 Thyroxine, T3 Uptake, T7 (Free T4 Index) (FTI), CRP C-Reactive Protein, Ferritin, Serum Iron, White Blood Count, Red Blood Count, Hemoglobin, Hematocrit, MCV, MCH, MCHC, RDW, Platelets, Polys/Neutrophils (SEGS-PMNS), Lymphocytes, Monocytes, Eosinophils, Basophils, Neutrophils/Polys (Absolute), Lymphs (Absolute), Monocytes (Absolute), Eosinophils (Absolute), Basophils (Absolute), Granulocytes – Immature, Granulocytes – Immature, Granulocytes – Immature (Abs), ESR-Erythrocyte Sed Rate, Westergren, Vitamin D 25-Hydroxy (total)

, , , , ,

I didn’t eat for 3 days

More American’s have run a full marathon than have completed a 3 day fast. I was surprised to find it easier than I’d imagined. I attribute this to my practice of intermittent fasting weekly for the past 3 years.

As the healing miracles continue to be revealed in the research of fasting, I had to try it out myself. Most attractive to me was the promise of DNA repair, cellular autophagy (consuming damaged cells), and creating my own stem cells. Some people spend up to $30,000 on stem cell therapy. We have our own internal, built-in pharmacy and can use fasting to regenerate stem cells for free! See geeked out research article excerpts below.

From Thursday night to Sunday night, I drank only water and black coffee. I took a couple capsules of magnesium and potassium each day as well as a small amount of pink himalayan sea salt. Nothing else!

I felt my worst end of day 2 and felt my best end of day 3. I kept up with my daily routine of hot and cold exposure by way of infrared sauna and cold plunge ice bath. My breathwork routine felt wonderful as always and really took the edge off if I started to feel like a headache might be coming. I treated 45 patients over the first 2 days of fasting. I was worried about running out of gas at the office on day 2 and felt that if I could make it past that point, the home stretch on a lazy Sunday would be fine.

The most trying temptations came during the cutting of the pizza for my children on Friday night, and the peeling of apples for them on Saturday afternoon. I slept great night 1 and poorly night 2. I was tossing and turning through the nightmare that I’d eaten one of those beautiful apples, ruining the 3-day streak early. I felt ashamed and upset with myself for not making it as long as I had targeted. What a relief to find upon waking that it wasn’t true.

I tried a urinalysis on Sunday night and found ketones as predicted. This told me that my body had successfully adapted to ketosis to burn fat as fuel instead of carbs. I weighed in on Sunday night down 6 pounds and again on Monday night back up 10 pounds! Now I have a only a slight idea of what my MMA patients have to go through regularly during weight cuts in preparation for fights. 

After a glorious meal Sunday evening, I woke up Monday feeling pretty groggy. After the fog lifted, I felt refreshed, motivated, excited and proud to have accomplished the challenge. One of my favorite osteopaths, Dr. Joseph Mercola, practices prolonged fasting once every quarter to reap the amazing benefits.

The challenge of fasting can be described as “homeodynamic eustress” or good stress. Similar to the good stress that is induced when we exercise. By exposing the human body to these challenges, it becomes stronger. We can sometimes over-train with exercise and cause more harm than good. The same is true of fasting.

Some benefits of prolonged fasting include:

1. Promotes Blood Sugar Control by Reducing Insulin Resistance

2. Promotes Better Health by Fighting Inflammation

3. Enhance Heart Health by Improving Blood Pressure, Triglycerides and Cholesterol Levels

4. Boost Brain Function and Prevent Neurodegenerative Disorders

5. Aids Weight Loss by Limiting Calorie Intake and Boosting Metabolism

6. Increases Growth Hormone 

7. Delay Aging and Extend Longevity

8. Aid in Cancer Prevention and Increase the Effectiveness of Chemotherapy

Fasting is not recommended for everyone! Consult your doctor and proceed at your own risk. 

Side effects of fasting include dizziness, headaches, low blood sugar, muscle aches, weakness, dehydration and fatigue. Prolonged fasting can lead to anemia, a weakened immune system, liver and kidney problems, and irregular heartbeat. Fasting can also result in vitamin and mineral deficiencies, muscle breakdown, and diarrhea. The risks get more complicated and severe the longer you stay on a fast, or if you repeatedly go on fasts.

Individuals who are underweight, struggling with weight gain, under 18 years of age, pregnant or breastfeeding should avoid prolonged fasting. People with comorbidities like diabetes and heart disease should consult a professional before attempting prolonged fasting.

Geeked-out research:

“72 hours of food restriction can induce widespread upregulation of autophagy in CNS neurons. Disruption of autophagy can cause neurodegenerative disease, and the converse also may hold true: upregulation of autophagy may have a neuroprotective effect. Starvation in neuronal cell lines can remove toxic molecules and damaged mitochondria from neurons.”  

Cheng, Adams, Perin, et al. Prolonged Fasting reduces IGF-1/PKA to promote hematopoietic stem cell-based regeneration and reverse immunosuppression

“Our results indicate that cycles of an extreme dietary intervention represent a powerful mean to modulate key regulators of cellular protection and tissue regeneration but also provide a potential therapy to reverse or alleviate the immunosuppression or immunosenescence caused by chemotherapy treatment and aging, respectively, and possibly by a variety of diseases affecting the hematopoietic system and other systems and organs. Prolonged fasting reduces damage in bone marrow stem cells.”

Cheng, Adams, Perin, et al. Prolonged Fasting reduces IGF-1/PKA to promote hematopoietic stem cell-based regeneration and reverse immunosuppression

“It is now understood that fasting can switch the metabolism from using glucose as fuel to using fatty acids. This shift seems to trigger our stem cells to become more active and regenerative. Prolonged fasting can activate pathways that enhance immune system regulation improving cellular resistance to toxins and stress. Stem cells drastically increased their rate of regeneration in subjects who were in a fasted state.”

Louis A. Cona, MD Medical Director of DVC Stem cell therapy clinic in Grand Cayman https://www.dvcstem.com/post/fasting-and-stem-cells

, , , , ,

Wim Hof Breathing Method

WimHofBreathing

Wim Hof Breathing Method

How we breathe has a powerful effect on our physiology. We can alter our breathing technique to significantly improve energy levels, detox the body, relieve stress and tension, and strengthen the immune system. Alternatively, many people suffer daily from shallow, anxious breathing that creates a toxic and acidic body chemistry. With a small amount of guidance and practice, you will quickly understand how easy it is to manipulate your body chemistry on the spot with your breathing. Below is a 10 minute introduction video from Wim Hof himself. Then under that is another video that will guide you through the breathing technique. And below that is a third video of Dr. B practicing one round of breathwork.

The official Wim Hof website warns not to practice this method if you are dealing with epilepsy, uncontrolled high blood pressure, pregnancy, a history of heart disease or stroke. First consult a healthcare professional if you have questions about a serious medical condition.

You can expect instant benefits as quick as your first session. These benefits can also become more pronounced with practice and commitment. Some of these may include:

  • Stress reduction
  • Faster recovery from physical exertion
  • Better sleep
  • Improved sports performance
  • Enhanced creativity
  • More focus and mental clarity

BE WARNED! If you are following along correctly, this will make you feel uncomfortable at first. As he recommends, only practice in a safe and stable environment. (not in a pool or a vehicle) It definitely feels much more comfortable on an empty stomach.

Video in summary:

  • Lay on your back comfortably and breathe 30 inhalations
  • Pull the air deep. First fill the lower abdomen, then chest, then pull air into your head
  • Do not force the exhale and do not exhale completely, simply allow the breathe to leave the lungs naturally
  • After these 30 deep breaths, exhale the last breathe and then do not inhale again for as long as you comfortably can. This length of time will vary for everyone, and will also get longer with practice.
  • As soon as you feel the urge to inhale, go ahead and pull a long, full breath in and then hold it at the peak of full inhale for around 15 seconds. Bear down and increase your abdominal and chest pressure to force the blood into your head.
  • Repeat 1 to 5 times
, ,

DOT Exam & Medical Card $75 at Baltuska Chiropractic in Lenexa, KS

DOT & CDL Physical Exam & Medical Card

$75 at Baltuska Chiropractic 

Call 913-283-9803 OR

Schedule Your Own Appointment Online Now Below:


Stick around after your exam for a Chiropractic Adjustment for just $45 extra!

ATTENTION COMMERCIAL MOTOR VEHICLE DRIVERS

Effective May 21, 2014, interstate commercial vehicle (CMV) drivers can no longer get a valid medical certificate from just any healthcare provider. Instead, CMV driver examinations can only be completed by Certified Medical Examiners (CMEs) listed on FMCSA’s National Registry.
The National Registry provides CMV drivers and carriers with a convenient list of medical examiners in their area who have been certified as having the knowledge to determine if a driver can safely handle the medical demands of driving a CMV.

You can find Dr. Baltuska’s listing as a Certified Medical Examiner on the National Registry at this link:

National Registry of Certified Medical Examiners

In preparation for your exam, please bring your driver’s license, an up to date list of your medications, and be prepared to provide a urine sample. (This is not a drug test) Your exam will take approximately 20 minutes. If you get the chance, you can print and begin filling out the first 2 pages of your intake paperwork using this link.

Call 913-283-9803 to schedule your DOT Exam at Baltuska Chiropractic in Lenexa, KS.

Dr. Kelly Baltuska, DC, CME

CME DOT ExamDr. Kelly Baltuska, DC Lenexa Chiropractor

, ,

Now offering Custom Fit Orthotics at Baltuska Chiropractic!

Foot Levelers custom orthotics support all 3 arches of the foot, which make up the plantar vault. They’re made by hand, based on a digital scan of your unique ankle and foot anatomy. Just as no two bodies are alike, no two pairs of Foot Levelers custom orthotics are alike.
Once the foot hits the floor, everything changes. The biomechanics of the body respond and adapt to the ergonomics of the feet. Over-pronation and flat feet are common culprits of many different health problems. Research demonstrates how custom fit orthotics help to alleviate back pain, neck pain, foot pain, ankle pain, knee pain, hip pain, plantar fasciitis, heel spurs, achilles tendonitis, shin splints, headaches, and fatigue.

Dr. B has enjoyed the benefits of Foot Levelers custom orthotics since 2010 after having a custom scan at Chiropractic College. Now he is very excited to have the technology available at his practice to offer this same service and product to his patients for $319+tax. Tell us you want a pair at your next visit and it will take just a few extra minutes to digitally scan your feet. Then your custom fit orthotics will be shipped and ready to pick up in 1-2 weeks.

Schedule your next Adjustment online now using this link

, ,

No Gym? No Problem! Dr. B’s 5 Favorite Exercises Against Gravity

bodyweightExercise

We don’t need a gym membership or fancy equipment to have a great exercise routine. Simply pushing against and resisting the forces of body weight and gravity are all we need to stay fit. Some experts argue that these exercises are safer and more efficient than using equipment. Try it for yourself! Beginners should start with just 10 repetitions, 3 times per week.
Pushups
Pushups are a classic body weight exercise that are simple and effective. They must be done with proper form to reduce potential injury at your shoulder, wrist or lower back. Common mistakes may be corrected by paying attention to the position of your arms, elbows and shoulders and by activating your core muscles.
Your hands should be shoulder-width apart and slightly behind your shoulders, toward your feet. Fingers are facing forward. Your elbows bend to approximately a 45-degree angle with your fingers widely spaced for balance and to increase the work of your lower arms, accessing more strength to lower and raise your body. Keep your elbows close to your body as you move through the exercise to give you more leverage.
Imagine squeezing something between your armpits and your body to keep your elbows aligned. Your elbows should stay above your wrists at the bottom of the movement, making a 45-degree angle at the elbows. If your elbows go past your wrists or flare to the outside, it increases your potential for experiencing an elbow overuse injury. Beginners modify pushups to reduce your effort by doing pushups from your knees instead of on your toes.

  1. Begin laying on your stomach on the floor, knees and hands shoulder-width apart and palms flat to the floor.
  2. Rise on your toes, elbows straight but not locked. Knees, hips, back and shoulders should be in a straight line. Hands remain palms to the floor with fingers pointing forward.
  3. Bend your elbows until your chest is an inch or so from the ground. Keep your head in a neutral position, looking no more than 6 inches in front of your body with your chin tucked.
  4. Straighten your elbows, pushing your body back into the start position without locking your elbows, all while keeping your knees, hips and back aligned and straight.

Triceps Dips
Your triceps are the muscles that run down the backside of your upper arm and may jiggle when you raise your arm to wave. These exercises can be done on a stable chair, bench or on a set of stairs. While sitting on the chair or step, place your hands shoulder-width apart on a chair or step with your fingers pointing toward your legs. Slide your bottom off, keeping your legs straight and place your weight over the heel of your hand.
Straighten your arms without locking your elbows to reduce strain on the elbow joints. Bend your elbows to lower your bottom until your elbow is at 90 degrees. Keep your back close to the chair and elbows in to your body as you raise and lower yourself. This is one repetition. Do not go past 90 degrees to reduce strain on the elbow joint. You can make the movement easier by bending your knees to 90 degrees and more difficult by raising your heels off the ground on a bench or chair.
Plank Ups
This is a simple exercise that is highly effective and more tiring than you might think. Start out in a plank position, identical to the starting position of a pushup. Instead of raising and lowering your body by bending both elbows simultaneously, you’ll be shifting your weight first to your right arm while bending your elbow on your left arm and placing your left arm on the floor with your elbow directly under your shoulder.
Moving your weight to your left arm, place your right arm with elbow bent on the floor, hand facing forward and elbow under your shoulder. Next shift your weight back to your right arm, straighten your left arm and push up on your left arm. Straighten your right arm with both hands directly under your shoulders. This up and down action is one repetition.
Bodyweight Squats
This simple squat maneuver works your core, quadriceps, calf muscles and glutes. Done correctly your knees will not go over your toes as this places undue stress on your knee joints. Begin in a standing position, feet shoulder-width apart, toes pointing straight forward and shoulders relaxed. Start the squat by bending at your hips, extending your bottom back as if you were getting ready to sit in a chair.
This protects your knee joints from excess stress. At first you may aim to get your knees to 90 degrees while sinking your weight into your heels and not over your toes. Use your arms for balance. Stay in the position for a second or two before rising.
Walking Lunges
These exercises help your balance, coordination, leg, glutes and core strength. Start in a standing position. Take one step forward, placing your foot slightly in front of your body without overextending. Sink down until your front knee is at a 90-degree angle without your knee crossing in front of your toes. Keep your weight balanced in the middle of the movement without shifting forward or back.
Push forward with your back leg as you drive your weight through the heel of your forward foot, using your quadriceps and glutes to raise your body. Swing the back leg forward as if taking a step and repeat. This describes one repetition.

Enjoy this 1 minute video below to help instruct you through each exercise:

, , , , ,

Slick Trick for Better Sleep (Iphone only)

I know you’re staring at your phone in bed so you might as well protect your eyes for better sleep. This blog is for Iphone users only. Other users must google search “Night mode” for their phone type.

You can use the Iphone Color Tint setting to turn your entire screen red. Red light is harder to see than other light frequencies, so it tricks our eyes into thinking it’s less bright than it really is. This means that you can look at a red screen in a dark room, and your dilated pupils won’t have to adjust as much to the light. Ultimately, the goal here is to reduce blue light exposure just before bed.

Normally, your brain starts progressively increasing the hormone melatonin around 9 or 10 pm, which makes you sleepy and keeps you asleep. Melatonin acts as a marker of your circadian phase or biological timing. By staring at you cell phone  just before bed, you are stifling your natural melatonin production, thus sabotaging your rest for the night. Ideally, you should discontinue using electronic devices at least an hour before bed, but many have developed habits of watching TV, laptops and computers, and cell phones even in their bedroom. 

Enable Red Tint

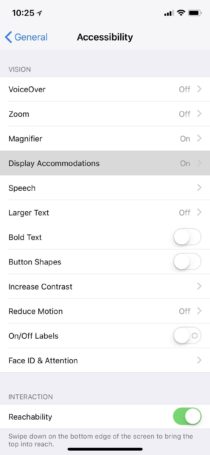
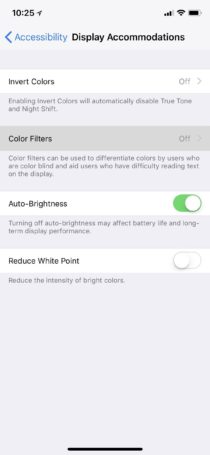
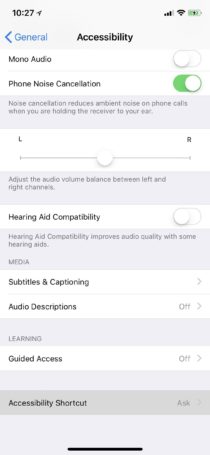
To enable this yourself, simply go to Settings > General > Accessibility > Display Accommodations. Here, you will touch the “Color Filters” option.  


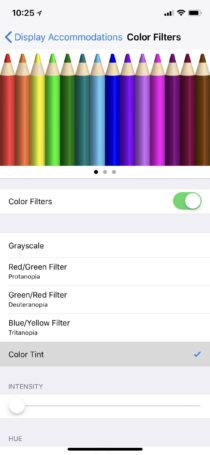
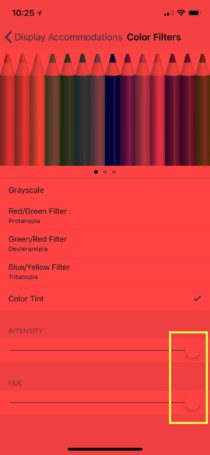
Next, enable “Color Filters” with the switch at the top of the screen, then select “Color Tint” as your filter. From here, scroll down just a little further, then use the Intensity and Hue sliders to make the red effect more prominent. Both should be in the far right position for maximum redness.


Step 2 Add a Shortcut for Your Red Tint

It is pretty inconvenient to have to keep going through this process to toggle the red filter on and off so let’s speed up this unnecessarily long process by enabling an Accessibility Shortcut to simply “triple-click” the Home button to toggle the red screen on and off instead.

To set it up, go to Settings > General > Accessibility, then scroll all the way to the bottom and select “Accessibility Shortcut.” Choose the “Color Filters” option from the list, and you’re done. Now every time you triple-click the Home button it’ll switch between normal screen and red tint. Next time your laying in bed staring at your phone, just press primary circle home button 3 times quickly to activate your new red screen safe mode. Then in the morning after you wake up, repeat 3 clicks to return to normal.


The amount and quality of your sleep isn’t something to be taken lightly. Many people give sleep too little priority on the list of things they do to be healthy. The consequences of a chronic lack of rest are much more serious and far-reaching than the vague feeling of fatigue you experience on and off during the day. Sleep is just as important to your overall health and longevity as good nutrition, and exercise.

Insufficient, poor quality sleep can undermine all your other efforts to lead a healthy lifestyle. Lack of sleep can set the stage for some very serious illnesses, including:

  • Changes in your brain activity similar to those experienced by people with psychiatric disorders
  • Entering into a pre-diabetic state
  • Weakened immune system
  • Faster tumor growth
  • Hormonal changes and fertility problems
  • Increased risk of cancer, heart disease, diabetes, and obesity

This is just one of many startegies that Dr. B recommends for better sleep. Checkout his previous sleep blog to learn more “Sleep Hacks”

, ,

Stretch it out! Relieve Low Back Pain, Hip Pain, and Sciatica Symptoms

PIRIFORMIS STRETCH

Here are some of Dr. B’s favorite muscles to target to relieve Low Back Pain, Hip Pain and Sciatica Symptoms:

Hamstring Stretch

From a wider-leg standing position, hinge forward at your hips without rounding your spine. Breath deep, engage your core muscles while bending forward as if to touch your toes. You should feel a great stretch along the back of your thighs without putting too much strain on your lower back. Alternatively, lay on your back with your butt up against a wall. Slowly walk your feet up the wall and make the knee as straight as you can. It is important to stretch gradually and not push so hard you strain the muscle.

Gluteal Stretch

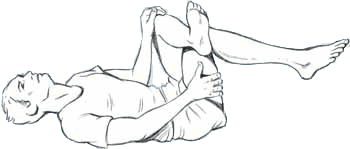
Your gluteal muscles might be super tight from standing all day long or perhaps they have stopped working from sitting all day long. Either way, they need a good stretch. Stretch and relax these muscles by lying on your back with both knees bent and your lower back flattened to the floor. Draw one knee to your chest, while you keep the other foot on the floor. Hold for 20 seconds and repeat with your other leg.

Piriformis Stretch

The piriformis muscle is located deeper behind the gluteal muscles. When it spasms it can cause pain your buttocks and irritate the sciatic nerve, triggering radiating pain down your leg. Lie on your back with both feet flat to the floor and knees bent. Place your right ankle on your left knee. Grab your left thigh and pull the left leg toward your chest while pushing your right knee slightly away from you. Release and repeat on the other side.

Hip Flexor Stretch

Your hip flexors are a group of muscles that connect your pelvis, thigh and deep abdomen at your lumbar spine. These are some of the most powerful muscles in your body, responsible for flexing your hip and raising your leg in front of you when you climb stairs. Sitting for long periods of time cause these hip flexor muscles to tighten and affect your lower back.

Kneel with one leg so that your left knee is touching the ground with your left foot behind you. Keep the right leg/knee in front of you with the right foot flat on the floor and a 90 degree bend in the right knee. (Classic wedding proposal kneeling or “genuflecting”) Now reach your left arm up above your head while slightly extending your full spine backwards. You should feel the stretch deep in your left lower abdomen and left upper thigh. Breath deep and repeat with the opposite side.

Quadriceps Stretch

If you have tight quads, they will affect the tilt of your pelvis and therefore your lower back. Stand on just your left leg and bend your right knee until your heel touches your right buttocks. Keep your knees together and stand tall to feel a great quad stretch along the front and top of your thigh and lap area. Repeat with the opposite side.

Diaphragmatic Breathing

Diaphragmatic breathing techniques are a good way to stabilize your back and naturally add traction to your spine. Sit at the edge of your chair and find length in your spine, sitting tall. Count to four slowly as you inhale, pause for four seconds, and exhale for a count of four. When you inhale, allow your lower belly to hang forward and try to expand your lower abdomen in all four directions around you. Imaging air filling your lungs as if it were water filling a pitcher from the bottom to the top. When you exhale, imagine pushing the energy from your lungs into the lower abdomen about four fingers below the navel and about 2 inches deep into your core.

Schedule your next Chiropractic Adjustment online now using this link!

, ,

Voodoo Floss Extremity Compression

voodoo floss

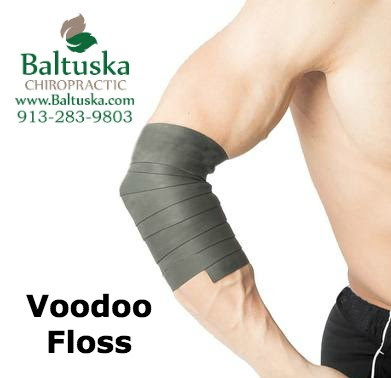
The gold standard of care for sports injury has always been R.I.C.E. which calls for rest, ice, compress, elevate. Many people are still resting and icing after they hurt themselves. But compression has since been forgotten. Even when compression was in, it wasn’t very aggressive – more like a little hug. Voodoo floss is extreme compression for a short time.

Silly name, simple concept. Explained easily, you wrap the injury really tightly with a thick rubber band and then move the body part around a lot for a couple minutes and then you take it off and feel better. Stupid simple. Much like some of the best things in life! There are many aspects of anatomy and physiology at work in this short process that can account for the benefits.

Voodoo Floss helps break up intramuscular adhesions to allow for greater mobility and blood supply to an area. By squeezing the muscle in a tight wrap, then forcing it through a full range of motion, friction between muscle fibers sheers and creates motion where motion was not present. Great for areas that foam rolling and lacrosse ball techniques can’t address with the same quick, do-it-yourself healing concept.

When you release the band after a treatment, a rush of fresh blood washes through the muscle and joint; this not only brings nutrients for growth and healing but also clearing away the idle and stagnant body fluids that might become isolated from a current or past injury. This works wonders to aid the healing of sprained, strained, inflamed and aggravated tissue. For swollen areas, this can decrease the edema and promote lymphatic drainage.

There is also tremendous benefit to practicing a full and pain free active range of motion in a painful area. The Central Nervous System naturally adapts quickly to pain and injury causing guarding, splinting and reciprocating in order to protect the area and decrease discomfort. This is great at first, but problematic if this response is drawn out into a length of time or even becomes permanent. One of the first things you may notice when tying off the floss and moving the area is the sweet relief of being able to move without hurting! This will reprogram your neurons to forget about the CNS response of guarding and begin to remember what it is like to move freely throughout your fully active range of motion.

There is also a beneficial local endocrine hormone response to temporary occlusion, resulting in increased Human Growth Hormone (HGH) and Nitrous Oxide (NO), two messengers that lead to improved healing and recovery times.

This wonderful treatment should be performed often to get ahead of the problem at hand. (2-5 times daily) Otherwise, if you are feeling fine, it should be performed intermittently to prevent and avoid injury much like the prescribed use of your foam roller for self care. (2-3 times weekly)

Unfortunately, as great as this tool can be, there are some areas of the body that floss does NOT help. Please avoid dangerous anatomical areas of the head, neck and trunk!

Do Not Voodoo Floss: head, face, neck, chest, torso, abdomen or back.

 Use Voodoo Floss: shoulders, arms, elbows, forearms, wrists, hands, fingers, thighs/hamstrings, knee, calf, ankle and foot.

The Voodoo Floss Band is an essential performance tool and should be a staple in the gym bag of every athlete looking to improve range & restore joint mechanics. Try out a Voodoo Floss Treatment for an additional $10 at your next Chiropractic Adjustment and/or buy your own gear at Baltuska Chiropractic or purchase now online here.